


Thank you so much for trusting me to capture your wedding memories! I have prepared this guide to help you figure out what the options are for preserving your wedding (or engagement) images in both digital and hard copy form.
Table of Contents
Make sure your wedding photos see the light of day
Don’t let your photos languish on a hard drive. Receiving your gallery link isn’t the end of the process… It’s just the start!
And as much as I would love to be the one to create beautiful custom art for your home, I totally understand there are other options. There are consumer labs out there that may not offer archival-quality products like we do, but may be cheaper than our products.
If you’d like to go that route, you’re welcome to! I just want to make sure that your photos aren’t stuck forever in the digital realm. Technology changes so quickly, what would happen if in 20 or 50 years the computers we use no longer support the image files we use today?
Or when Meta and Google no longer exist – and all your photos are deleted?
Make sure you create something tangible – this is your first family heirloom. The best time to do this is within the first few months after the wedding while excitement is still high. Otherwise it gets so far down the to-do list and will never be done.
Photos are meant to be a) seen and b) preserved. Let me show you how!
Back up, back up, back up
Though we’re talking about creating physical prints here, it all starts with backing up the digital files (your jpegs).
Be sure to back up your digital files in the highest resolution from your online gallery. Do not simply download the web-sized images: they are purely for social media and the web. The files you’ll want to save to multiple locations are the high-resolution digital images.
When you first open your completed wedding gallery, you’ll be presented with a walk-through in the format of a mini tutorial. In case you dismiss that or are not familiar with these kinds of icons, the downloading info is included here. It looks like an arrow pointing down with a line underneath it.
You will need to enter your email address to download your wedding photos. The download link is automatically emailed there, so please do not add fake email addresses to this field, as your wedding photos will be emailed to the address you give!
Download your high-resolution images from here:


The ‘download all’ icon is in the top right-hand corner of your gallery homepage, alongside some other options.
If you have any issues with this, please let me know immediately.
Once you’ve hit the link to download the whole gallery (visibly from the default homepage ‘mosaic’ view), the next step is choosing what resolution you’d like to download. For backing up purposes, make sure you select ALL the photo collections.


Be sure to hit the ‘high resolution’ option for the version of the gallery download you’ll want to back up.
How to download your wedding photos
Choose all photos or, manually select by tab/folder. On the screenshot above, you’ll see Google Photos is an option to back up to. This is a great way of keeping your images on your phone, but make sure it isn’t the only place your images are stored. Read more below…
The more places your images live, the less likely you are to lose them in the event of one of those sources failing. External drives can be purchased cheaply from Amazon, just make sure you get a reputable brand like Seagate, Sandisk or Western Digital (WD).
Here are a few I recommend, in different sizes!
WD 4TB WD Elements Portable External Hard Drive
Seagate Portable 1TB External Hard Drive
Maxone 500GB Ultra Slim Portable External Hard Drive
SanDisk 256GB Ultra USB 3.0 Flash Drive
SanDisk Ultra Flair 16GB USB 3.0 Flash Drive
Simply copy your wedding image files from your local computer drive to a new folder on your external drive. Or you can download the gallery directly to the external hard drive. You or your guests that you provide the download link to can download your wedding gallery as many times as you like, provided it’s still live.
The ‘sneak peek’ tab
These are actually duplicates of photos that appear elsewhere in your gallery!
Make sure that when printing, you find the fully edited version of the sneak peek photos, which are not finished to the same degree as the final images. Do not print out the sneak peeks, these are not the final photos.
External hard drives & cloud back-up
I recommend using two external hard drives to back up your wedding images. The first: stored locally. The second: stored off-site.
Offsite could mean your car, your parents’ house, your workplace or a friend’s house. This is to minimize the risk that in case of fire, theft or quake, at least this one heirloom can be salvaged from the alternate location.
- Good ideas: Download high res jpegs to your computer hard drive plus and external hard drive plus a secondary hard drive or thumb drive.
- Upload them to a secondary secure cloud storage solution like Dropbox or Google Drive and be sure to have a plan B in case you cancel your cloud subscription or switch providers down the road.
- Not good ideas:
- Only downloading the ‘web res’ image size. Too small to ever print!
- Uploading them only to Google Photos or some other online photo gallery, which doesn’t preserve the full data of the image and may not be around forever.
- Only saving a copy to your phone (which then gets deleted when you get a new phone!)
- Putting off downloading until after the gallery link expires! It’s only guaranteed to be live until the date shown on your gallery delivery email. After that it could be deleted without notice (for example when my business ceases operation).
- Forgetting to download the photos at all! When I’m no longer around, this means you will not get any wedding photos and there’s nothing at all that could be done about it at that point! 😳


Branded USB sticks are available for purchase – more information is in your album pricing guide!
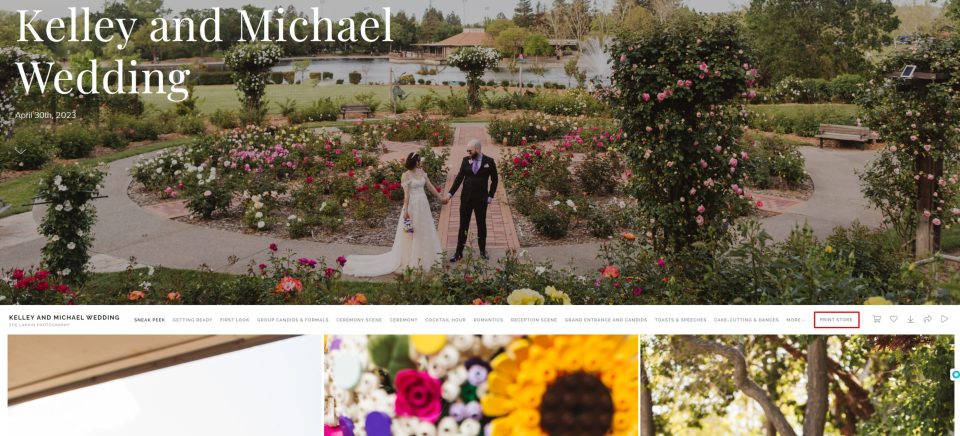
How to order prints and wall art
Your finished wedding gallery (not the sneak peek one), will have a store built into it. It is accessed by going to the ‘Print Store’ on the homepage of your gallery shown below:

If you’re viewing an individual photo, you can hit the ‘Buy Photo’ button in the top right hand corner that refers to buying a print of that photo, which also brings you into your store options:


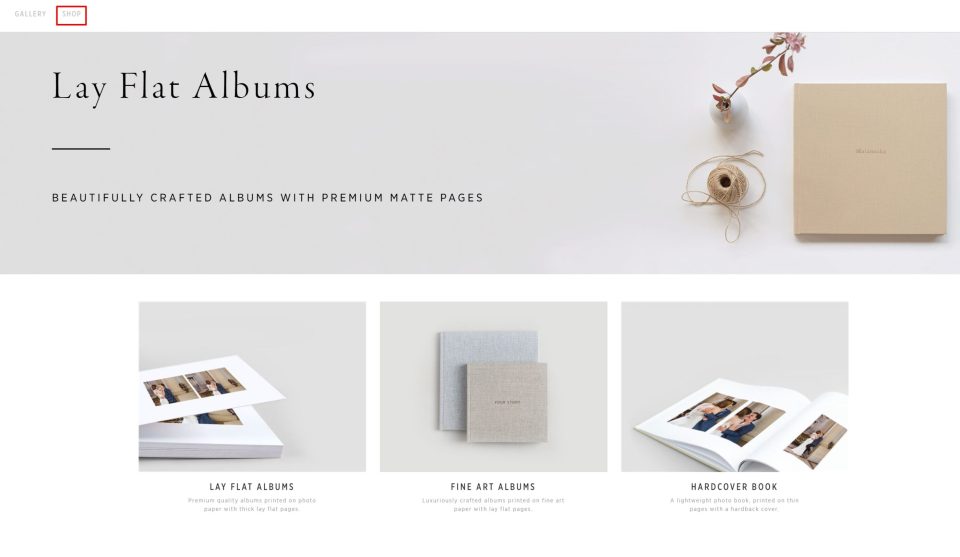
That will bring you to this screen where you’ll see the various options of products available with different tabs as well. In the example below, there are tabs for Prints, Wall Art and Cards.


What size prints?
When you download your photos, you might notice the file size of each photo you’ll receive is actually quite small. I’m talking here about how many megabytes the file is. Does that mean the photo can only be printed in a really tiny size?
No! The files are smaller than photos from your phone because each file is processed using professional compression software that exists solely to remove unnecessary file bloat from jpeg images without compromising quality.
We remove file bloat so that downloading, transferring and sending the files is much faster.
The largest download size on your finished gallery prints up conservatively up to 20 X 30 with a close viewing distance. You might want to consider larger prints if you’re looking at mounting on the wall. This is how an 8 X 10 without a mat looks above a couch.


I can barely see this 8 X 10 canvas! Even framed and matted, it would still be lost in the space
If you’re not into super large prints where your face is super large in the frame, you might want to consider a wall collage with multiple framed prints. This works well for a variety of home settings, particularly for statement walls such as in the entryway, above the bed above the couch or mantlepiece.


Nothing here is huge by itself, but together the collection creates a bold impression
Speaking of print sizes, it’s worth briefly bringing up ratios when it comes to printing. Your wedding photos are taken in and delivered in a 2 X 3 ratio. The only exceptions are film photos and exception cases such as where a panorama has been necessary.
Therefore, if you do not want the image to be cropped, you should stick to print sizes which are in the same ratio as the original. This includes for example 4 X 6, 6 X 9, or 10 X 12 (instead of 5 X 7 or 8 X 10 or 11 X 14 for example). Exceptions are if you want to adjust the cropping (if the photos could be improved) by making it more of a square shape for instance going from a 4 X 6 to a 5 X 7 where nothing vital is lost in the process of the crop.
I’ve written a dedicated article about crop ratios below:


The software that runs my print store is called Pixieset. You can check in the address bar to see whether you’re in the print/wall art store (Pixieset) or the album store (Pic-Time), in case this is a little confusing.
How to purchase an album
An album tells the whole story of your day. The storytelling approach that we specialize in lends itself very well to this medium. Whether you’re having a 10-hour day captured or a 2-hour City Hall wedding experience, our approach encompasses telling the complete story of your day with each moment given equal weight, rather than fewer more contrived, more heavily-worked ‘standalone’ shots.
The interactivity of flipping through the spreads is so special. The narrative unfolds slowly, with each spread giving more insight to the emotions, the key players, the details, each activity and the overall feel of the event.


Wedding albums are always a good idea!
In 2021, I moved over to a fully self-service model for albums, in addition to my already self-service print store. That means that you, the client, will select and order all post-wedding printed products (both prints/wall art AND albums), yourself.
This is what your album store will look like on entry. You’ll be able to select the product that you like, and there is no obligation to purchase anything at all if you just want to browse and weigh your options:
There are numerous benefits to this. To name a few:
- You’re not paying for my time spent designing your album, corresponding with you, sending rounds of revisions through the proofing system etc. With the wedding industry being in overdrive since 2021 with no sign of slowing down, that time was becoming both costly and scarce. I can no longer offer a one-on-one service for post-wedding sales like I used to. Therefore…
- You’re getting the best prices as you’re cutting out the middleman (me!).
- You get to adjust and design exactly how you wish. Rather than adding comments through the clunky and antiquated feedback system (where you could only add notes, not design yourself!) this new system empowers you to lay out spreads exactly as you’d like.
- You’re getting access to professional album suppliers (vs going with a consumer lab) which are only available to professional photographers. They do not sell directly to the public. Their quality is absolutely sublime! It knocks the socks off the likes of the consumer brands you might find online or locally such as Shutterfly, MPix, Printique, Nations, Walgreens, CVS, CostCo, etc.
- You have a dedicated support team built into the app! If you run into any snags at all, there is a dedicated help team you can reach by using the chat bubble in the bottom right-hand corner of any screen. They are very responsive and usually get back to me within minutes. Alternatively, if it was something about any photo itself, for example a retouching request, get in touch with me after checking out this retouching guide.
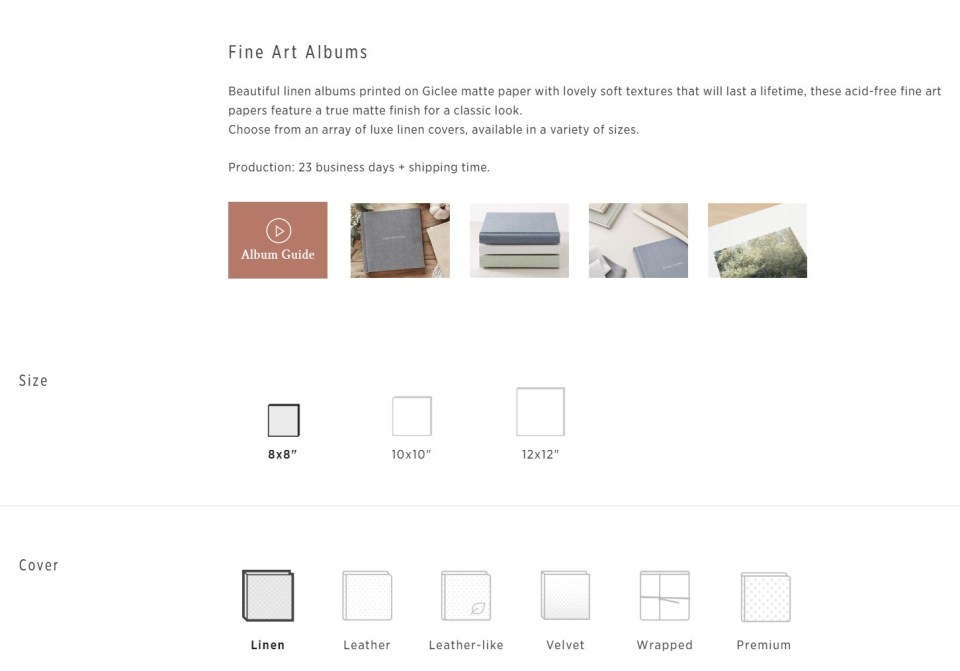
- You have SO many customization choices! You can choose from a variety of cover types, materials, sizes as well as three different types of albums and books, from Hardback Books through to Fine Art Albums. I’ve included an example of this screen below.
- It’s easy! The album software I use is extremely intuitive and even uses a layer of AI to auto-generate a design for you that you can then tweak, so you’re not faced with blank pages to start with. You don’t need to be a professional designer anymore to create beautiful album spreads.
Here’s an example of an auto-design that you’ll see when you first enter. You can choose whether you want to use this as your starting point or not:


- You can take longer if you wish to complete your purchase. Though I only guarantee any galleries or sales platforms shared with you to be live for a year (in the case that I close my business, for example), I will not close them down on you! If you see I’m still in business and still posting and shooting weddings, then your sales products will stay live. It is however recommended to complete all sales within one year of your wedding gallery going live, just in case they need to be removed without notice.
- You can dip in and save your design as you go along. No need to complete your album design in one sitting! Just make sure you use the same email address as the one I have on file for you. You can also share the design with your partner and they’ll able to log in as well. You can also share with ‘guests’ using the software for example if you’d like a friend’s input.
- As your photos and memories are so personal to you, it’s way easier to play around with which photos you want to include. Before, you had to make rigid selections as to which photos I’d then create your design with. It was a painful process for clients to go back to the full selection and give me image numbers to switch photos out with if they had a change of heart or just ‘wanted to see how it looks’. You can make your own judgment as to whether you want to leave lots of white space or even cram as many photos in as possible!
This is what your album store will look like on entry. You’ll be able to select the product that you like, and there is no obligation to purchase anything at all if you just want to browse and weigh your options:

Here’s more about the options that are currently available (though the options, production time and pricing are dynamic and are subject to the individual supplier that happens to be fulfilling that particular order):

The software that runs my album store is called Pic-Time. You can check in the address bar to see whether you’re in the print/wall art store (Pixieset) or the album store (Pic-Time), in case this is a little confusing.
Social sharing
Social sharing is most definitely encouraged! I include the ability in your gallery to download images at a more manageable web resolution.
The only social media platform I use is Instagram where you can find me at @zoelarkinphoto.
Please ‘tag’ me by using the ‘tag people’ function. You should also add in the caption/ comment below ‘Photo by @zoelarkinphoto’ or words to that effect. Please tag at the same time that you post.
I also have accounts on Facebook, Twitter and Pinterest also at @zoelarkinphoto so you can tag me there too.
Everywhere else please use an active hyperlink to https://zoelarkin.com/
Please don’t crop or otherwise alter the images I’ve supplied. This includes the use of filters to change the colors, levels, exposure, contrast or any other aspect. However, I’ve no issue if you’d like to combine photos with those taken by someone else, or use them as part of Reels or other videos, just make it clear who’s authored them!
Vendor sharing
I try to share galleries with your wedding vendors. This is important so that they can benefit from professional images of their creations!
Relationships are the currency of the wedding industry so it is a super valuable opportunity to make personal connections with fellow wedding vendors.
I also need to run through some guidelines about using my images for commercial use. These are included below in case you’re curious.

Important note: if you request more photos
As you know images for your finished gallery are selected with the highest level of care and attention.
You can be sure that nothing that would have made a worthy addition to your gallery has been left out.
However if you do make any requests for additional photos (which may come at a fee, but I try to accommodate all reasonable requests!) please do so within 6 weeks of receiving the gallery.
While I endeavor never to delete the final jpegs that comprised your final gallery, RAW files that were not chosen will eventually need to be permanently deleted to free up space, keep my costs down and speed up my systems.
If there is anything you are not happy about, please tell me ASAP. I will ‘close your file’ 6 weeks after you receive your final gallery, after which time it would be too late to retrieve anything from the original files created on your wedding day.


Yay – you did it!
Leave 5* reviews for your photographer!
I know everyone says it these days. But for high-touch boutique businesses, where client volumes are low and new customers only find us online, a 5* review is priceless.
I have put together some information to help you write fleshed-out, informative reviews. It’s super easy and shouldn’t take more than 10 mins of your time. Please read my super detailed and actionable guide to writing a review for your wedding photographer.
I’ve compiled a ton of templates to use, questions to can answer and give you tips as to how to create a review that’s really valuable to your wedding photographer, so you’re not left wondering what to write!
There are three places I collect reviews, in order of importance:
Please follow the links above to leave a review, copying and pasting to all the platforms you use. Feel free to add some of your fave pics if you like!
Unlike restaurants and stores which are relatively low-touch, reviews of 4 stars or below can damage the reputations of small, boutique businesses that provide a high-touch service. If you cannot give 5* please get in touch and I will try my best to remedy the issues.
Tell your friends and give a tip!
The best kind of tip is a referral! But regular tips are also very much appreciated (but never expected). My Venmo is @zoelarkin) Below is a screenshot so you know it’s me! The last 4 digits are 9939.
If you worked with an associate photographer, please consider tipping them more so than tipping me. I do not expect a tip, ever. I can let you know the associate’s Venmo so you can tip them directly.


Click the screenshot above on your phone to be taken to Zoe Larkin Photography’s Venmo profile
If a tip is not within your budget, don’t worry! Once again, wedding photographers do not expect a tip, especially when it’s the business owner who’s shooting. I do have some info below however about 17 things you can do to be an awesome wedding photography client!
I hope this helped figure out what to do with your wedding photos! There are so many options, I hope this wasn’t too overwhelming. Do get in touch to discuss informally what options might work for you, but I have endeavored to make this guide as comprehensive as I can to hopefully answer all of your questions!
Bay Area wedding photographer – Homepage | Bay Area Wedding photographer – Info, pricing, about & portfolio


Related articles
https://zoelarkin.com/wedding-album-guide/
Understanding crop ratios when printing your wedding photos
Can I get all the RAW files / unedited jpegs from my wedding?